Working out a good way to install the Starlink took quite a bit of thinking and time. The dish and router were very easy, with the cabling being the time consuming part. This included learning how to make the connections to the cable.
The design requirement for this installation is; it should be quicker to setup the Starlink, quicker than it takes to make a cup of coffee. This allows the coffee to be enjoyed while checking email and surfing the Internet.
The Dish
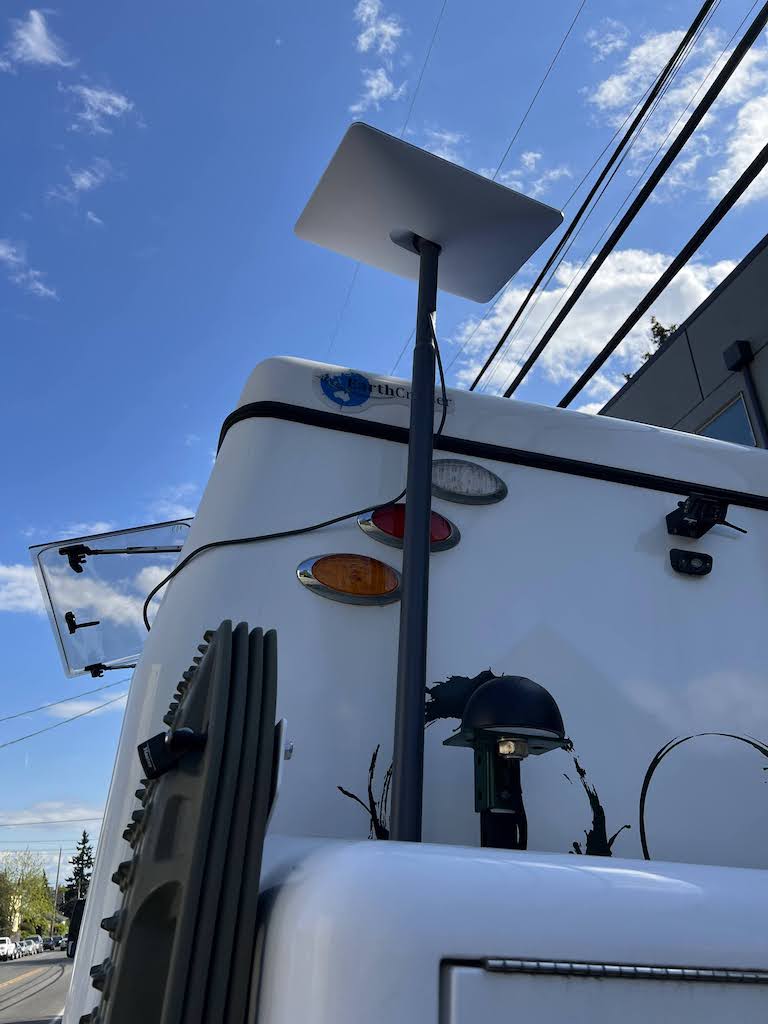
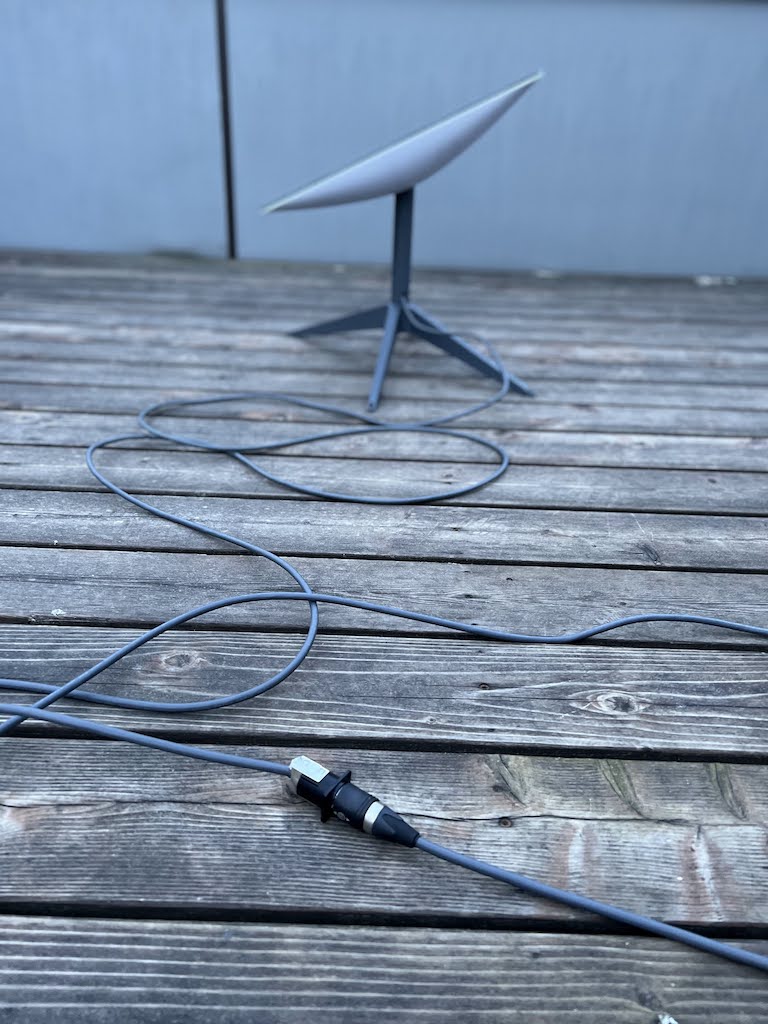
The dish, also known as Dishy McFlatface, comes with it’s own little stand. We added a second mounting option based on the Starlink ground pole.
The dish snaps into the stand provided in the kit, and being portable can be placed in a location that has a clear view of the sky. This is especially useful when Molly is under the shade of trees. And while it is possible to permanently mount the dish onto Molly’s roof, trees would likely obscure any satellite reception. If high winds are expected, then we will have to either secure the stand to the ground or not use the portable stand at all.
Our second option is based on the Starlink Ground Pole Mount. The Pole Mount ships as two separate poles. One pole slips into the other pole, and with three stiff taps to the ground, the once separate poles are joined for life.
For our installation, the pole was 30cms (1 foot) longer than it needed to be, so a hacksaw fixed that problem. As an added advantage, the shortened pole is also now able to fit into our rear storage locker, which is where we store it while driving. Our pole is now 1.88 m (74 inches) long. We had a plastic end cap laying around, and that was used to cap the freshly cut end, and prevents the metal surface of the pole grinding against the metal surface of the rear bumper.
This factory ground pole has a significant advantage over other pole options, as one end is shaped to allow the dish to snap onto the pole. They are made for each other.
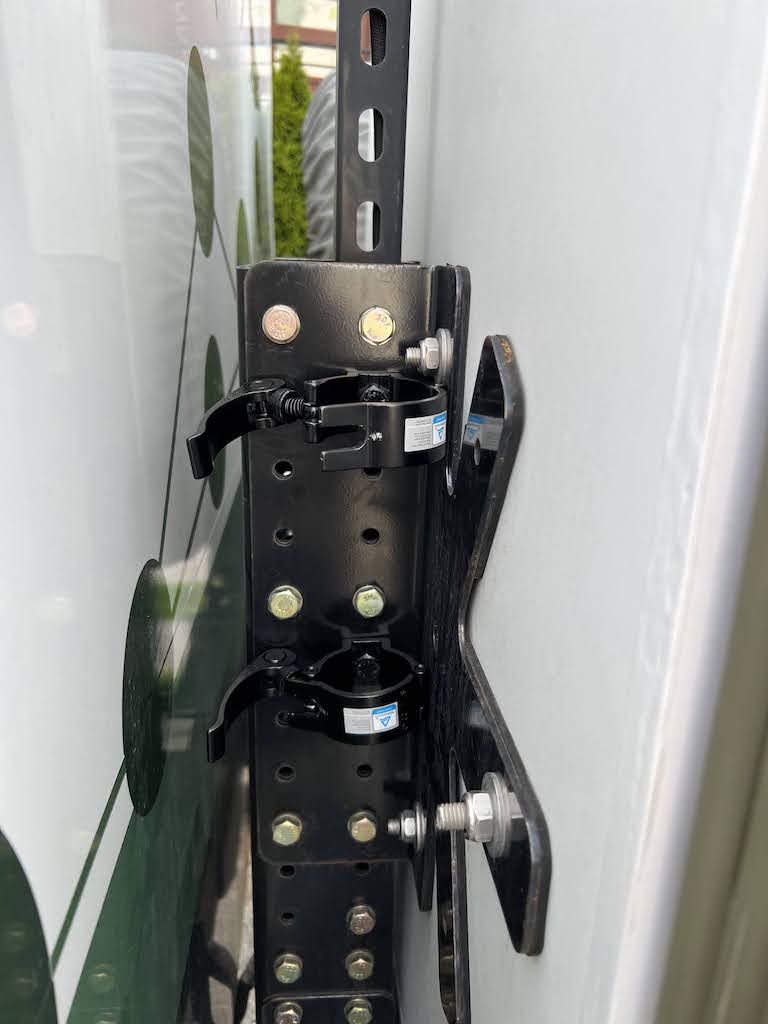
The pole is attached to a bracket on the rear bumper with two quick release F34 truss clamps. The truss clamps we purchased had wing nuts, and these were replaced with metric stainless steel bolts, to be consistent with the hardware standard of the truck and to ensure they do not rattle free on rough roads.
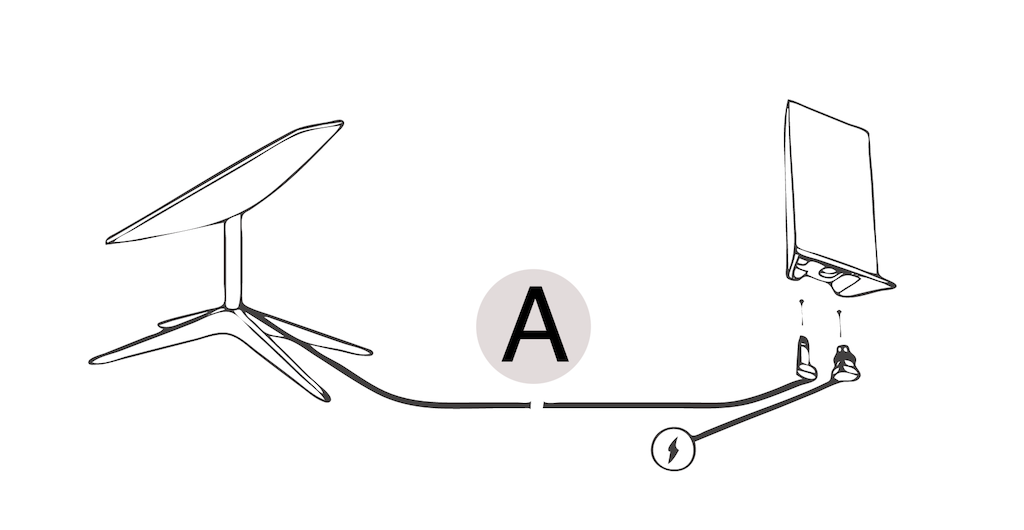
To set up the dish on the pole, the dish is snapped to one end of the pole, the data cable is attached at both ends (dish end and junction box end) and then the pole is raised into position and clamped to the rear bumper mount. The installation takes about 30 seconds.
Making the installation probably took about two hours and and we are very pleased with the end result. It is very sturdy indeed.
The Router
Starlink comes with its own router which creates its own wifi network. We already have a router, our Cradlepoint router, so we don’t really need another one and another wifi network. Instead we replaced the Starlink Router with a third party Power Over Ethernet (POE) injector. The POE injector takes on the responsibility to provide power to the Starlink dish, which is normally provided by the Starlink Router. The POE injector also exposes a standard ethernet port, which is connected to the Cradlepoint Router with a CAT6 cable. The POE injector we used is from boondocker.io.
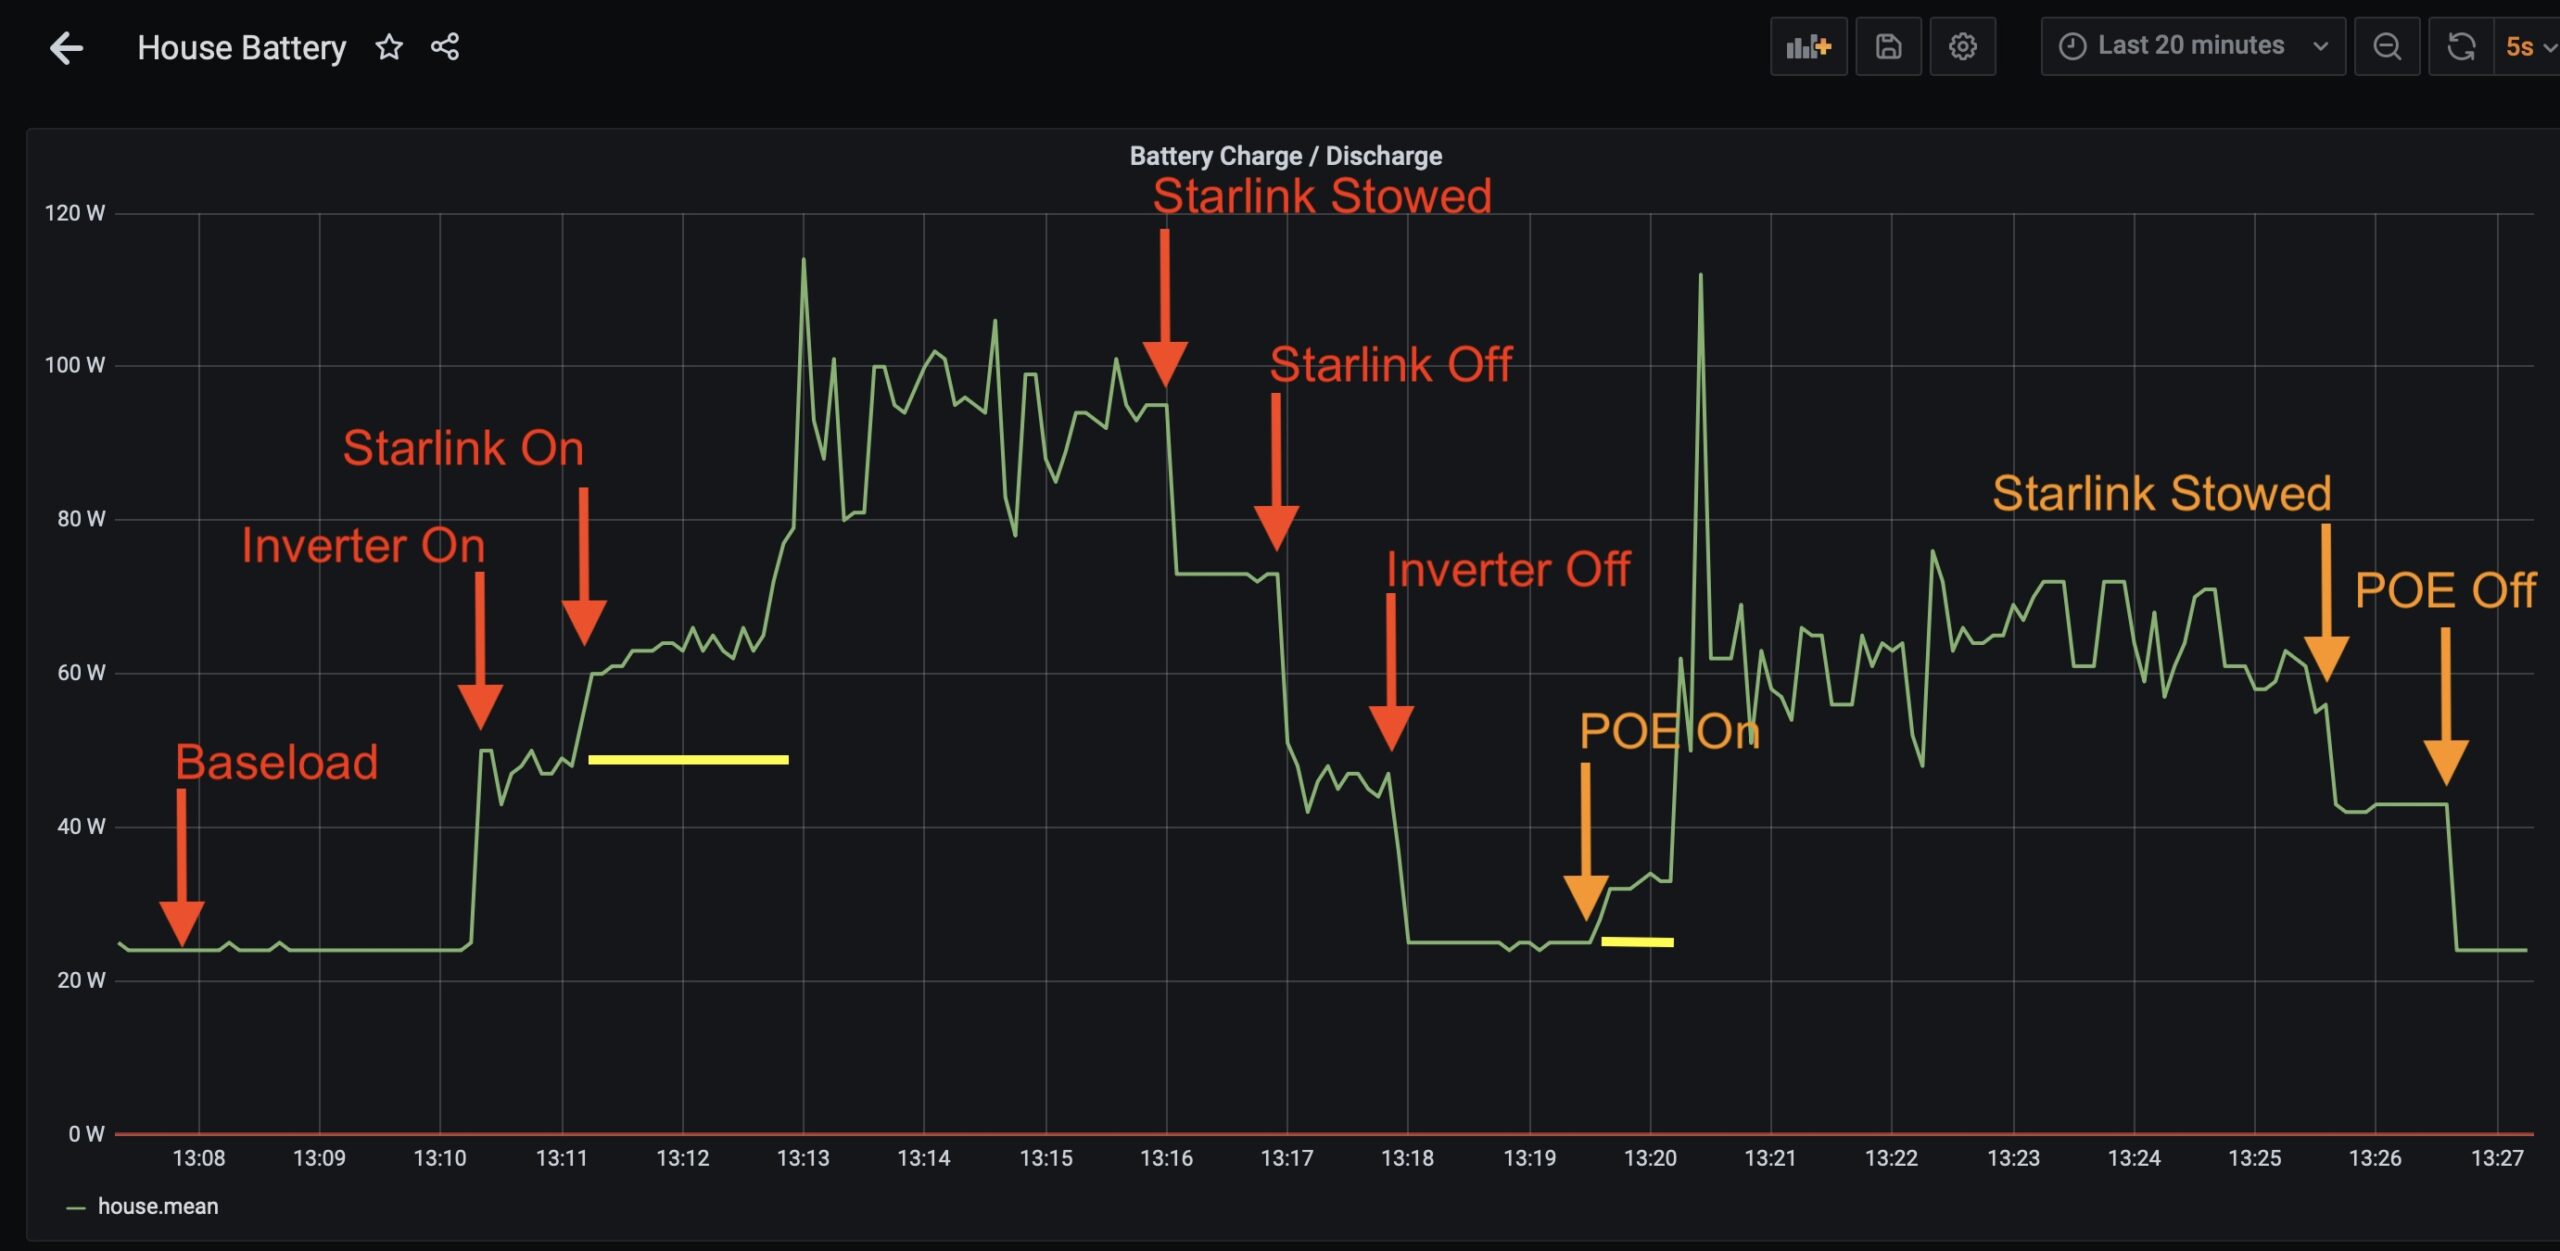
The main advantge of replacing the Starlink router with a POE injector is to reduce power consumption. The Starlink Router is powered from 110 volts ac, and requires us to run the inverter which introduces power loses. The Starlink Router also needs power. Overall the POE injector is about 40 watts or 40% more power efficient than the Starlink Router and Inverter combo.
Cabling
Designing and creating a cabling and connectors was the complicated part. We wanted a system that would allow us to setup and teardown the dish quickly and without having to pass cables through windows or doors which then have to be cracked open, letting in little creatures. The solution is a junction box located outside of the house. On the side of the junction box there is a suitable weather sealed port where we can plug the cable from the dish. There is also a permanent cable from the junction box, through the floor of the house and then onto the POE injector. Selecting the right type of connector for the job took a little bit of internet research. Learning how to make the cables took even longer.
This first phase was a cable prototype to ensure the fancy connectors would work on the bench and sort out how to wire things up.
The Starlink supplied cable has their own proprietary weather-sealed plug, and we could not find anywhere on the Internet to buy these. So, we purchased a second extension cable from the Starlink store, the longer 150 foot (45 m) version, and this cable will be dedicated to the portable mount, and will provide a little extra reach when needed. We then sacrificed the original 75 foot (25 m) cable for the parts needed to make a new shorter cables.
It is a little nerve racking to cut into a perfectly good cable, but we knew we had the second cable if anything went too badly wrong. Once we had the original cable connected up and fully installed, we then modified the second cable, as it also needed to have a new plug added to it.
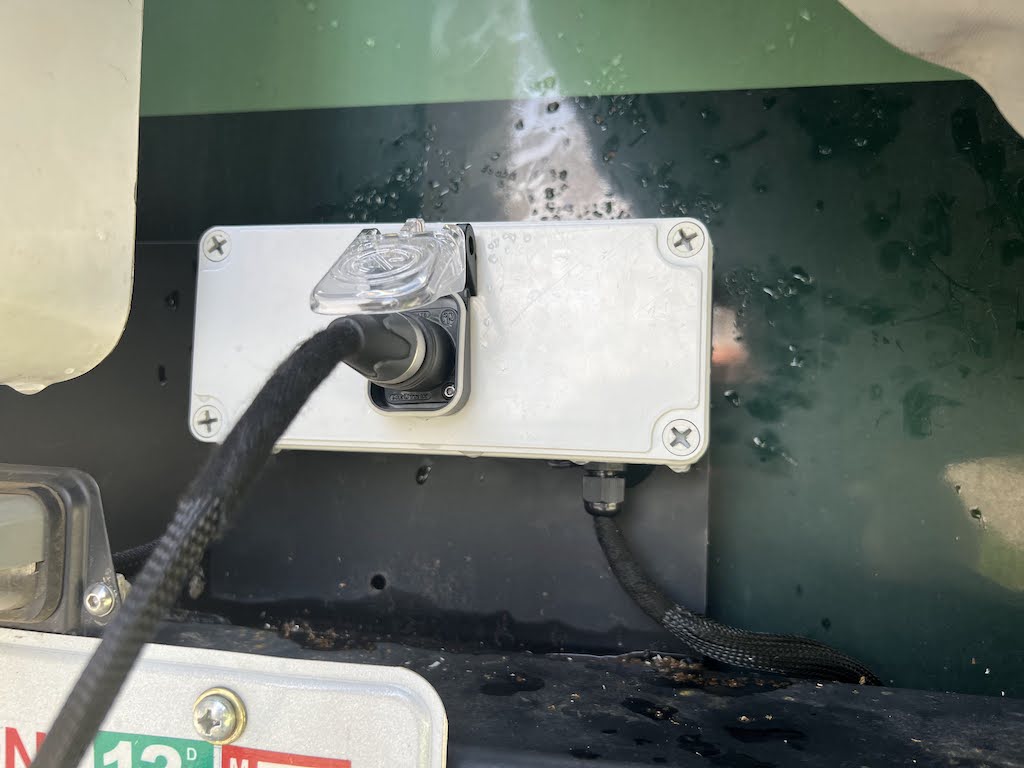
For the connectors, we decided on the Neutrik NE8MC6-MO etherCON CAT6 Cable Plug as the male end and the Neutrik NE8FDY-C6-B etherCON Cat 6 D-Shape Panel Connector for the female end. This connector set is very rugged and provides high noise immunity and EMI protection, is dust-proof and is waterproof when mated. And when not mated, the panel connector is protected by a Neutrik SCCD-W Spring-Loaded Cover. This connector set is outside and potentially in a dusty environment. It has an IP65 when not in use which increases to IP67 when connected. The connector set will go into a junction box, which was purchased form Amazon, being the Makerele Waterproof Electrical Outdoor Junction Box with dimensions of 180mm x 80mm x 70mm with a weather rating of IP67.
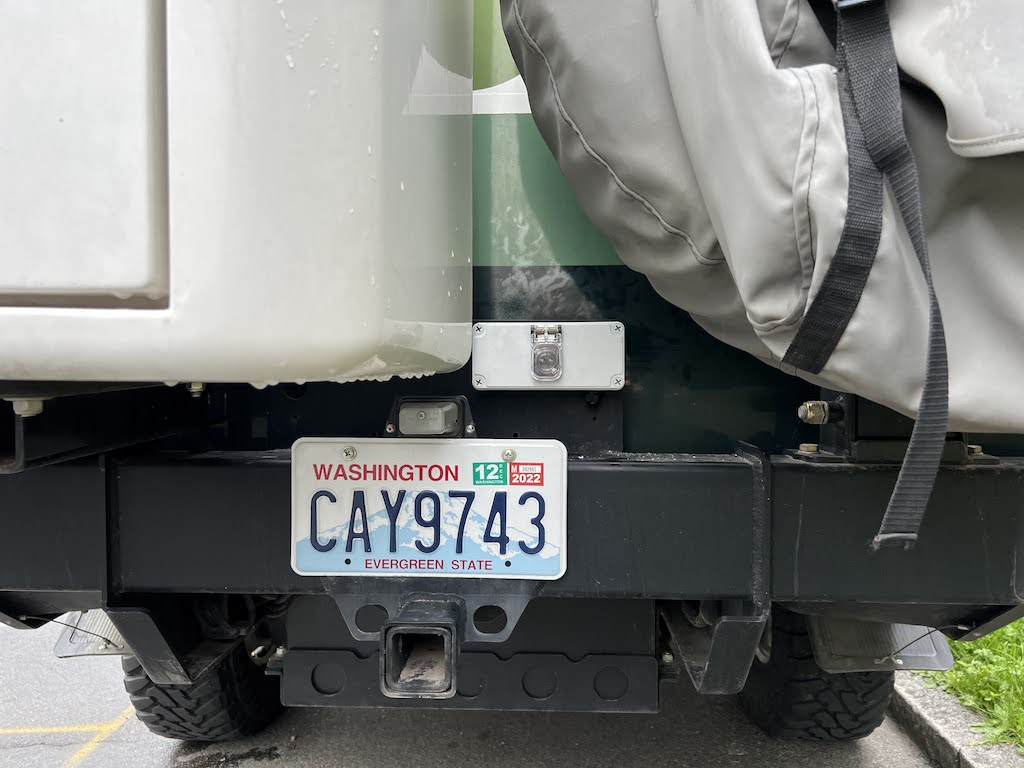
The connector set and junction box is located at the rear of the truck near the dish mount and the license plate. This location will get lots of dust, but doesn’t seem to be a problem.
Update: After spending a week on the road in very dusty conditions, the good news, the dust proof cover works great.
The POE injector is permanently cabled to the junction box, and either the pole mount cable or the portable mount cable can be connected to the junction box depending on which mount is being used.
We have added a rodent deterring and chew resistance sleeving to the portable mount cable, to give the cable a little more protection when laid on the ground and obviously to deter critters from making our cable into their lunch. The pole mount cable got regular black sleeving for added protection.
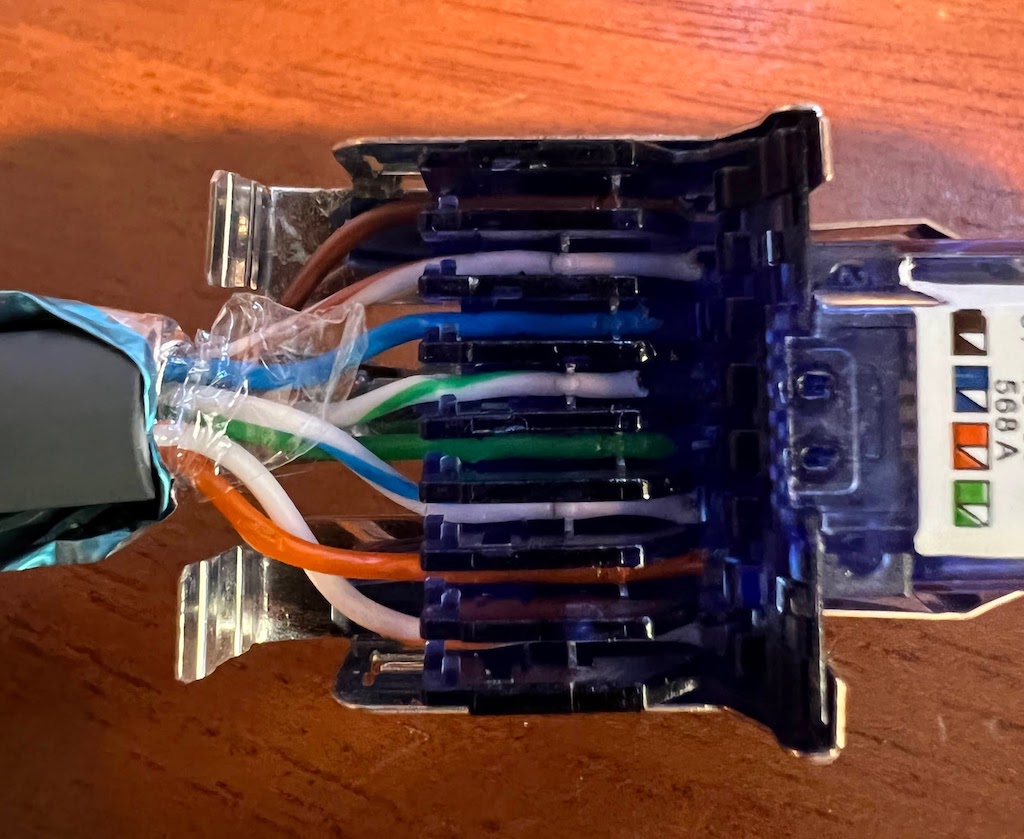
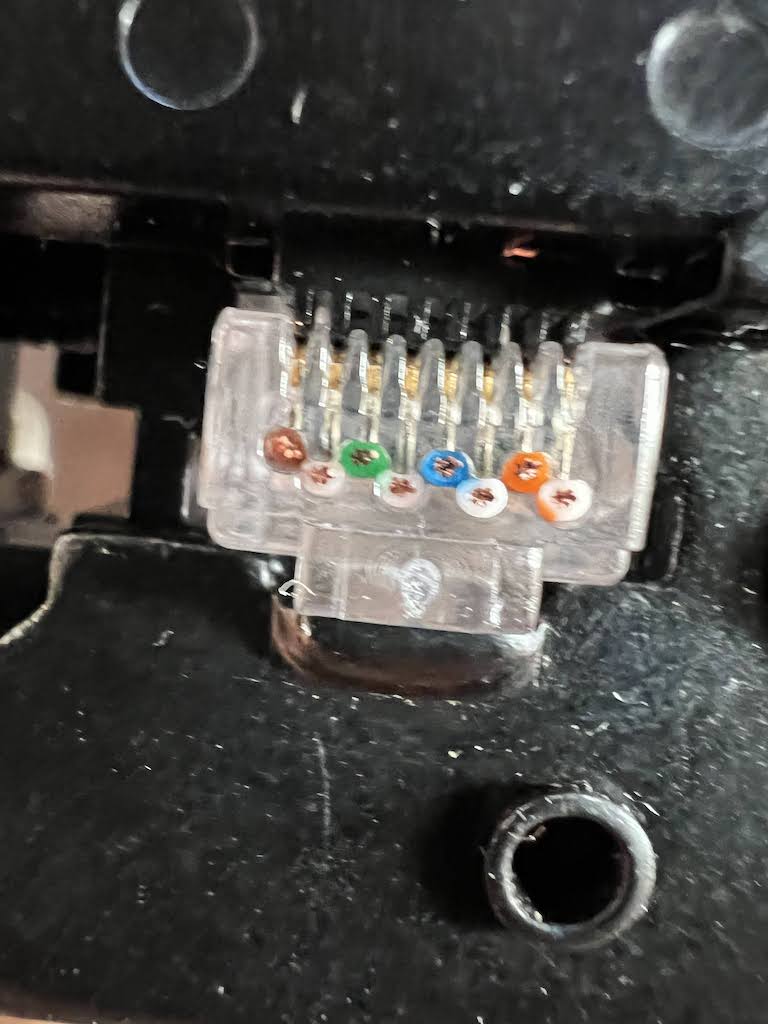
It took a long time to work out the correct wiring for the connector set. And then it took a long time to work out how the connector set bits all fit together. Also, the connections are not simple pass-though connectors, and this also had to be worked out.
We extended the work done by Tucks Truck outlined in this post. The male end was wired up following the color code of the original Starlink’s cable, although it is not wired in a standard configuration. This also means that the female end is also not wired up in a standard way.
The order of the wires on the female connector are
- Brown
- Brown/White
- Blue
- Green/White
- Green
- Blue/White
- Orange
- Orange/White
The order of the wires on the male end are
- Brown
- Brown/White
- Green
- Green/White
- Blue
- Blue/White
- Orange
- Orange/White
The female connector is located in the junction box. The Starlink cable is quite thick, so for the male connector, we trimmed a few millimeters off the end of the plastic cable carrier so the two fittings would screw together snugly.
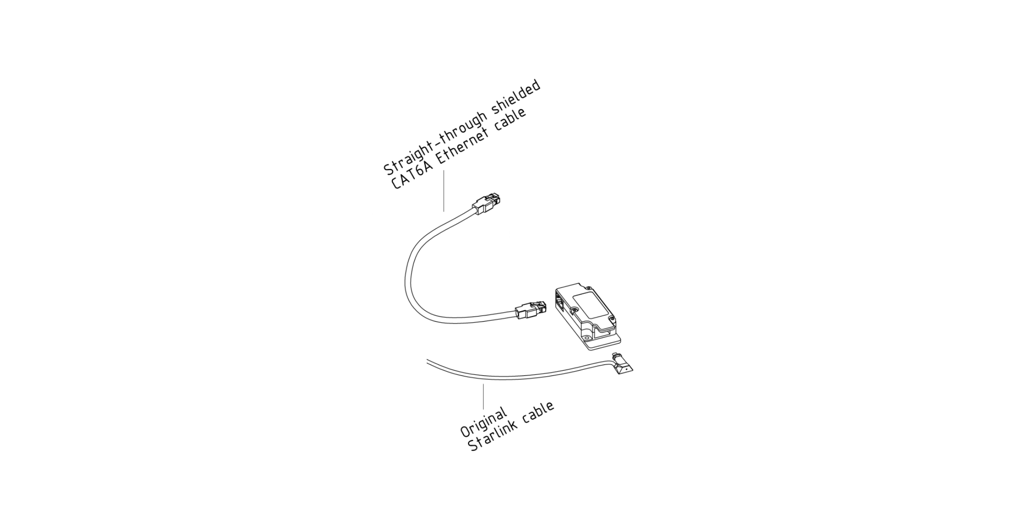
We did not chop off the Starlink proprietary connected which would normally plug into the Starlink Router. Instead we purchased the YAOSHENG Rectangular Dishy Cable Adapter, which converts the Starlink connector to RJ45. This means we can still use the Starlink router should we ever want to.
POE Injector
The boondocker.io injector accepts 10 to 30 volts dc as the power supply. In our case it is connected to our 12 volt dc batteries. The POE injector will create the 48 volts dc required by the Starlink Dish and inject that into the cable going to the Starlink Dish. The other cable is connected to the WAN port of the Cradlepoint Router.
Final Wiring
The final wiring is
- Starlink Dish is connected to truck using the original Starlink cable but with a cut in the middle. One side of the cut is a male RJ45 connector and the other side of the cut is a female RJ45 connector. The cable can be remade by connecting them together. The same change was made to a longer version of an equivalent Starlink cable.
- The female RJ45 connector is in a dust proof housing and is cable is cabling to the inside of the house with the original Starlink proprietary cable on the end.
- This proprietary cable is converted to a more standard female RJ45 connection the YAOSHENG adaptor.
- The YAOSHENG adaptor is connected to the boondocker.io POE injector with a shielded CAT6 ethernet cable. Also connected to the boondocker.io POE injector is a 12 volt dc power supply.
- Lastly the boondocker.io POE injector is connected to the Cradlepoint Router with a CAT6 ethernet cable.
Router Configuration
Starlink is connected to the WAN port of the Cradlepoint Router and has a higher priority than the cellular modem WAN connection. If both Starlink and Cellular is available, then the Router will prefer the Starlink connection. Other options are configurable in the Router.
We had to add a static route to our Cradlepoint Router to make sure the iOS Starlink app worked correctly. Basically we routed all 192.168.100.0/24 traffic out over the WAN port.